Showing posts with label Oracle EBS-PA. Show all posts

Saturday, April 5, 2014

Programs which determine cost in Project Costing module

Programs which determine cost in Project Costing module


We should run the below programs to determine the costs in Project Costing Module

To determine labor costs run the below programs

1/  PRC: Distribute Labor Costs (or)  PRC: Distribute Labor Costs for a Range of Projects

To determine cost for usage and miscellaneous transactions run the below program

1/ PRC: Distribute Usage and Miscellaneous Costs

To determine the supplier cost run the below programs

1/ PRC: Interface Supplier Costs

2/ PRC: Distribute Supplier Cost Adjustments (or) PRC: Distribute Supplier Costs Adjustments for a Range of Projects

To determine expense report cost run the below programs

1/ PRC: Interface Expense Reports from Payables

2/ PRC: Distribute Expense Report Adjustments

To determine costs for borrowed and lent accounting run the below program


1/ PRC: Distribute Borrowed and Lent Amounts


To determine the burden cost run the below program

1/ PRC: Create and Distribute Burden Transactions


The above program creates burden transactions for projects based on the method to store burden costs.


To determine total burdened cost run the below program


1/ PRC: Distribute Total Burdened Costs


The above program creates total burdened cost distribution lines for all transactions on a burdened project.


References:-

Oracle Documentation

Friday, April 4, 2014

How to resolve APP-PA-19947 Mean in the Expenditure Types (PAXSUDET) Form?

How to resolve APP-PA-19947 Mean in the Expenditure Types (PAXSUDET) Form?

When users try to create an expenditure type you may get the below message:-

APP-PA-19947 There are expenditure types existing which are not associated with a expenditure type class. These expenditure types will not be acceessbile during expenditure entry.

To resolve the above message, please follow the below steps:-

1/ Execute the below SQL Query and note down the expenditure types

Select distinct expenditure_type from PA_expenditure_types where expenditure_type not in (select distinct expenditure_type from PA_expend_typ_sys_links);

2/ For each type returned in the above query execute the below steps:-

2.1/ Navigation: Projects Responsibility > Setup > Expenditures > Expenditure Types

2.2/ Query the expenditure type returned in the 1st Step.

2.3/ Enter the expenditure type class

2.4/ Save the record.

Thursday, April 3, 2014

ERROR: You Do Not Have The Authority To View Financial Plans For This Project

ERROR: You Do Not Have The Authority To View Financial Plans For This Project

This post is related to the PA Module in Oracle EBS Version 11i to R12.X+.

Sometimes users get the below error when they try to access the financial plans:-

You Do Not Have The Authority To View Financial Plans For This Project

Solution:-

Set the profile option, 'PA: Cross Project User -- Update' to 'Yes' for the affected responsibilities.

If the issue still doesnt resolve please check the metalink note: 236704.1

Sunday, February 24, 2013

R12 Projects - Burden Costing Implementation Steps


Burden Costing Implementation Steps:-


What is burdening?

Burdening is Oracle Project's overhead cost calculation system. Burdening allows overhead cost to be marked up on raw expenditure item cost based on a rate system. Total Burdened Cost is calculated as follows:
Raw Cost = Quantity * Raw cost rate
Burden Cost = Raw Cost * burden cost multiplier
Total Burdened Cost = Raw Cost + Burden Cost


Steps to Implement Burden Costing

1/ Define Cost Bases and Cost Base Types (Required)

2/ Define Burden Cost Codes (Required)

3/ Define Burden Structures (Required)

4/ Set the profile option PA: Default Burden Schedule Type (Required)

5/ Define Burden Schedules (Required)

6/ Implement Burden Costing Extension (Optional)

7/ Set the profile option PA: Report Separate Burden Transactions with Source Resources (Required)

8/ Set the profile option PA: Create Incremental Transactions for Cost Adjustments Resulting from a Burden Schedule Recompilation (Optional)


Default Hierarchy of Burden Schedules(Summary)

1/ Project Type

2/ Project

3/ Task

Precedence

2 overrides 1

3 overrides 2

Default Hierarchy of Burden Schedules(Detail)


Example

Project Type = Burdened


Task Burden Schedule Override Exists?=No


As you can notice in the above window there exists no Task Burden Schedule Override

Project Burden Schedule Override Exists?=No


As you can notice in the above window there exists no Project Burden Schedule Override


Task Burden Schedule = Yes


Expenditure Type Exists in the Structure of the Scheduled Revision?=Yes

Query the above expenditure Schedule and note down the Structure


Query the above structure and ensure that your expenditure item type exists as shown below:-


As you can see the Expenditure Type 22 Motor Pool Trucks exist in the above burden structure.

When you create an expenditure batch using the above expenditure type then the burden schedule LABOR ONLY will be applied.

If the Raw Cost =100 then the Burden Cost will be =100*.5=50
Total Burdened Cost=100+50=150

An Example can be noticed in the below screen:-


References:-

Oracle Documentation

Friday, February 22, 2013

Project Expenditures Implementation Steps

Project Expenditures Implementation Steps


The steps to implement the Project Expenditures in R12 are:-


1/ Define Expenditure Categories (Required)


Expenditure Category describes the source of your organization’s costs such as Labor Costs.

(N) Projects Super User > Setup > Expenditures > Expenditure Categories


2/ Define Revenue Categories (Required)


Revenue Category describes a source of your organization’s revenue such as Labor Revenue

(N) Projects Super User > Setup  > Expenditures > Revenue Categories


3/ Define Units (Required)

(N) Projects Super User > Setup > System > Units


 4/ Define Expenditure Types (Required)

(N) Projects Super User > Setup  > Expenditures > Expenditure Types


Tax Classification Code:-


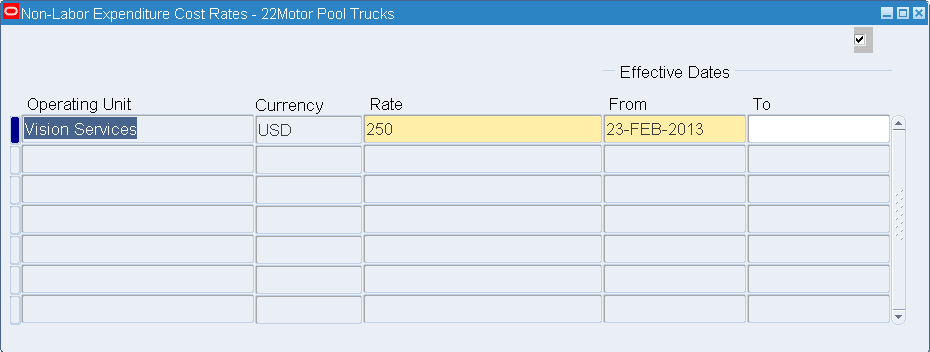
Cost Rates:-


 5/ Implement Transaction Control Extension (Optional)


Transaction control extensions allow you to define your own rules to implement company-specific expenditure entry policies. 


For more information on Transaction Control Extension refer to the below link:-

http://docs.oracle.com/cd/A60725_05/html/comnls/us/pa/trxcnt02.htm


6/ Implement Autoapproval Extension (Optional)


Use the AutoApproval Extension to define conditions under which expense reports in Oracle Internet Expenses or timecards in Oracle Time & Labor are approved automatically. You can configure this extension to meet your needs.


7/ Define Transaction Sources (Optional)


Transaction sources identify the source of transactions imported into Oracle Project Costing using Transaction Import. 

The transaction source determines how Transaction Import processes transactions. The transaction source is used to identify transactions in the PA_TRANSACTION_INTERFACE_ALL table. 

When you run the concurrent program PRC: Transaction Import, you must enter the transaction source for the transactions that you want to import into Oracle Project Costing. The Transaction Import program selects all eligible pending transactions in the PA_TRANSACTION_INTERFACE_ALL table that satisfy the selection criteria of the program request and determines the validity of each transaction.

References:-

Oracle Documentation

R12 - Project Statuses

Project Statuses

How Project Statuses Control the Transactions

(N) Projects Super User >  Setup > System > Statuses


We define project statuses in the above window.

As you can see in the above window, for each status we can select which actions are allowed and which actions are restricted. To allow charges on a project, you must assign the project a status with the status control Create New Transactions enabled. To allow users to adjust transaction on a project, you must assign the project a status with the status control Adjust Transactions


How to Define Project Statuses


To define a status:


1. Navigate to the Statuses window.
(N) Projects Super User >  Setup > System > Statuses

2. Select the Status Type that you want to define (such as Project).

3. Enter a Status name. Status name should be unique.

4. Every status must map to a predefined system status. Therefore you need to map a  System Status to the new status you are defining. 

5. Optionally enter a Description.

6. Optionally enter Effective Dates.

7. If you want this status to be eligible for use as the starting status for the kind of object it is associated with (such as a project, task, assignment, or candidate), check the Starting Status box.

8. Status Controls: The Status Controls region contains a list of actions that are allowed or restricted for each status.

When you create a new status, the system status you have selected for the status determines which actions are allowed for the object to which the status is assigned. If you want to change the status controls from the default settings, you can select or clear the Allow box.

The Default check box is display-only, and contains the original setting of the Allow check box.
For some system statuses, there are Allow check boxes that cannot be changed. For example, if a project status maps to the Closed System Status, the project status cannot allow Create New Transactions.

9. Next Allowable Statuses: Use this region to define the next allowable statuses for each status.

Four radio buttons control the next allowable statuses you can enter:
• All: The current status can be changed to any status. This is the default value.
• None: The current status cannot be changed.
• System Status: The Next Allowable Statuses are all system statuses.
• Status: The Next Allowable Statuses are all user-defined statuses.

If you choose System Status or Status, you can then enter as many next allowable statuses as you want.

10. Workflow: If you want to initiate workflow when an object is updated to this status, select the Workflow tab and select the Enable Workflow check box and enter a value in the following fields:

• Item Type. Enter the name of the Workflow Item Type to be used for this status.

• Process. Enter the name of the workflow process to submit for this status.

• Success Status. Enter the status to assign to the object upon successful completion of workflow.

• Failure Status. Enter the status to assign to the object if workflow fails. (This can be the same as the current status.)


11. Save your work.


Sample Business Case


When the project is created, it's initial status is Submitted. A workflow will be triggered and the delegation authority should approve the project before it can be used while creating the below transactions:-

  1. Purchase Orders
  2. Invoices
  3. Expenditures
But it takes some time for the delegation authority to approve the project. Before the project is approved, users receive few POs and Invoices related to the un-approved project.

If you want to enter the transactions against the un-approved project, then you need to enable the 'Create New Transactions' check box in the Project Statuses Window.

References:-

Oracle Documentation